Elite artistic performance and great product design share a surprising DNA. At the highest level, both are exercises in deliberate constraint and staged perception. In championship rhythmic-gymnastics routines, choreographers optimize movement, apparatus, staging, timing and visual motifs to produce memorable moments under intense scoring rules. When designers adopt the same thought-methods — designing to constraints, engineering anchor moments, cross-domain analogy, and micro-practice testing — they produce garments and lifestyle objects that photograph better, perform better in real life, and sell more reliably.
This playbook — which we call Cn rhythmic — distills that strategic thinking into concrete, repeatable methods designers and studios can use to create bodysuit patterns, repeat-safe print designs, and small decorative lamps that form the visual anchors of a product release.
This post is for the creators: the apparel designers, product studios, boutique brands, tech-pack teams, and art directors who crave a repeatable process for turning abstract cultural inspiration into tangible, manufacturing-ready assets. It’s for those who know there must be a better way than simply “making it pretty” and hoping for the best.
A design brief lands on your desk. The mandate: “Use Tang-dynasty patterns for the new yoga capsule,” or “Find inspiration in European court dance for the A/W collection.” The most common, and most superficial, response is to treat this as an exercise in ornamentation. We find a compelling pattern, scale it, and apply it to a pre-existing block. The inspiration becomes a decorative “skin.”
The more powerful move—the one that separates good design from iconic design—is to translate that motif into function.
This means asking a deeper question: what mechanical, optical, or behavioral effect does this motif create when it is mapped intelligently onto a garment’s surface or a product’s form?
In the world of rhythmic gymnastics, cultural motifs are never just decoration. A sharp, angular pattern on a leotard isn’t just there to look “dynamic”; it’s placed precisely along the kinetic chain of the body to visually amplify the speed of a turn, giving judges a clear, scorable impression of technical mastery. A flowing, gradient color scheme isn’t just “pretty”; it guides the eye to the arc of a ribbon, making its path appear longer and more graceful.
The motifs become timing cues, apparatus guides, and formation anchors. They serve the performance.
When we apply this same approach to apparel and product design, inspiration stops being a suggestion and starts becoming a set of rules. This is where the magic happens.
Practical Translation Examples:
From Music to Movement: A design brief calls for inspiration from the Chinese guzheng, a zither-like instrument. Instead of just printing a picture of the instrument, we analyze its form and function. Its long, resonant strings create vertical lines. We can map this motif to a vertical seam or a printed panel that runs up the torso of a performance top. Now, when the wearer takes a deep breath during a yoga pose, the panel visually elongates, creating a “movement grammar” that reads as elegant and intentional, especially on camera.
From Rhythm to Engagement: A brief is inspired by the percussive beat of a drum. Instead of a generic geometric pattern, we map the motif to function. The sharp, timed “beat” becomes a high-contrast cuff on a sleeve or a colored band at the hem of a legging. In a short video loop for Instagram or TikTok, these elements act as visual punctuation marks, drawing the eye to the wearer’s timed arm and leg gestures. This makes User-Generated Content (UGC) far more likely to look polished and professional, increasing its viral potential.
From Dance to Dimensionality: The brief is “ribbon dance.” A literal interpretation is clumsy. A functional one is brilliant. The flowing, three-dimensional shape of a ribbon can be mapped to a print fade. We can engineer the print file to have heavier, more saturated pigment across the stable torso area, fading to a lighter tone at the seams and high-stretch zones like the outer thighs and shoulders. This has a powerful optical effect: it dramatically reduces the perceived distortion of the print when the fabric stretches, ensuring the design’s integrity during movement.
These are not just abstract creative ideas. They are the foundation for measurable constraints that are documented in tech packs, complete with precise placement rules, defined safe areas for printing, and specific manufacturing tolerances. They transform art into engineering.
The Cn_rhythmic Methods: A Deep Dive
To make this philosophy actionable, we organize the core methods into five pillars. These are not sequential steps but interlocking principles that product teams can use to build a more robust and intelligent design process.
Score-First Creative Engineering
In rhythmic gymnastics, a routine is built backward from the score sheet. The choreographer and athlete know exactly what the judges are looking for: difficulty points (D), execution points (E), and artistry points (A). Every sequence is engineered to maximize this score.
Design teams should operate with the same clarity. Instead of designing to a vague goal like “create a best-seller,” they should design against a concrete, objective rubric.
Define your success metrics before you sketch. For any new Stock Keeping Unit (SKU), these might include:
Fit Tolerances: Define acceptable stretch and recovery percentages. For a performance legging, this might be a maximum of 6% permanent set after 50 stretch cycles (Lfinal−Linitial/Linitial≤0.06).
Photographability: Define a series of “anchor poses” that the garment must pass without bunching, pulling, or distorting the core design motifs. This is a simple pass/fail test.
Print Integrity: Specify the maximum allowable pattern distortion at key seams or stretch points (e.g., “no more than 15% horizontal shear on the hip motif in a deep lunge pose”).
Comfort Metrics: Quantify what “comfort” means. This could be thermal regulation targets measured by breathability (CFM, or cubic feet per minute) or rules against placing certain seams over high-friction zones.
How to Implement: For each new SKU, create a one-page Product Playbook. This document is the north star. It lists the measurable criteria, the target values, and a simple pass/fail checklist to be used during every stage of sampling. It forces objectivity into a subjective process.
ai design repeat safe print design abstracttech pack focus
Motif-as-Functional-Constraint
This pillar is the practical application of our core insight. It’s about moving from “let’s apply a Tang motif” to “let’s define how this Tang cloud motif will manage visual stretch across the quadriceps.”
The process is one of documentation and justification. For every primary design element, you must articulate the mapping from motif to placement and the functional reason behind it.
Why is this motif here?To create a visual hierarchy that draws the eye upward.
Why is it placed away from that seam?To avoid a complex pattern match that would increase manufacturing costs and potential for error.
How does it interact with fabric stretch?The motif’s densest area is placed on the lower back, a zone of relative stability, while its lighter, more open elements extend over the glutes, where fabric distortion is highest.
Deliverable: Create Design Grammar Cards. These are simple, reusable digital assets (like SVGs or slides in a deck) that visually pair a motif sketch with its placement rules, functional purpose, and no-go zones. These cards become part of the institutional knowledge of the brand, ensuring that design logic is carried forward from season to season, even if team members change.
Cross-Domain Analogical Design
Breakthroughs often come from looking outside your own domain. Apparel designers can become trapped in a feedback loop, only looking at other apparel for inspiration. The Cn_rhythmic method insists on borrowing movement cues and structural ideas from disciplines far removed from fashion.
Think about the dynamic pressure points on the body. Where do garments need to support, flex, or emphasize a gesture?
Court Dance: The precise, controlled movements of Balinese or Javanese court dance can inform the placement of reinforced panels or subtle trim that highlights the elegant articulation of a wrist or ankle.
Theatrical Percussion: The explosive, full-body movements of a Taiko drummer can reveal where a garment is most likely to fail under dynamic stress. This can inspire the use of gussets, bartacks, or more robust fabrics in unexpected places.
Martial Arts: The powerful rotational forces in a Capoeira kick or a Karate kata can provide a blueprint for spiral seam lines that work with the body’s natural torque, rather than against it.
The Business Outcome: A significant reduction in product returns. When garments are tested and designed against the logic of real-world, high-intensity movements, they are far less likely to fail a customer during a workout or daily wear. You’re not just fitting a static mannequin; you’re engineering for a body in motion.
AI design mushroom lamp decorative spatial anchor lamp
Anchor Moments & Narrative Staging
In the digital age, a product’s life is lived in frames. The hero photograph on the product page, the three-second video loop on social media, the unboxing shot shared by an influencer. Every product needs an anchor moment.
The Cn_rhythmic approach treats the design of these anchor moments not as a downstream marketing task, but as a primary driver of the product design itself.
Before finalizing a design, define the 1-3 anchor moments for each SKU. These moments dictate everything.
Is the anchor moment a yoga backbend? Then the back of the garment is the hero. The design must feature a compelling detail there—a unique strap configuration, a cut-out, a focused print motif—that “activates” in that specific pose.
Is the anchor moment an unboxing video? Then the way the garment is folded and presented matters. Perhaps a key detail on the collar or cuff should be the first thing visible.
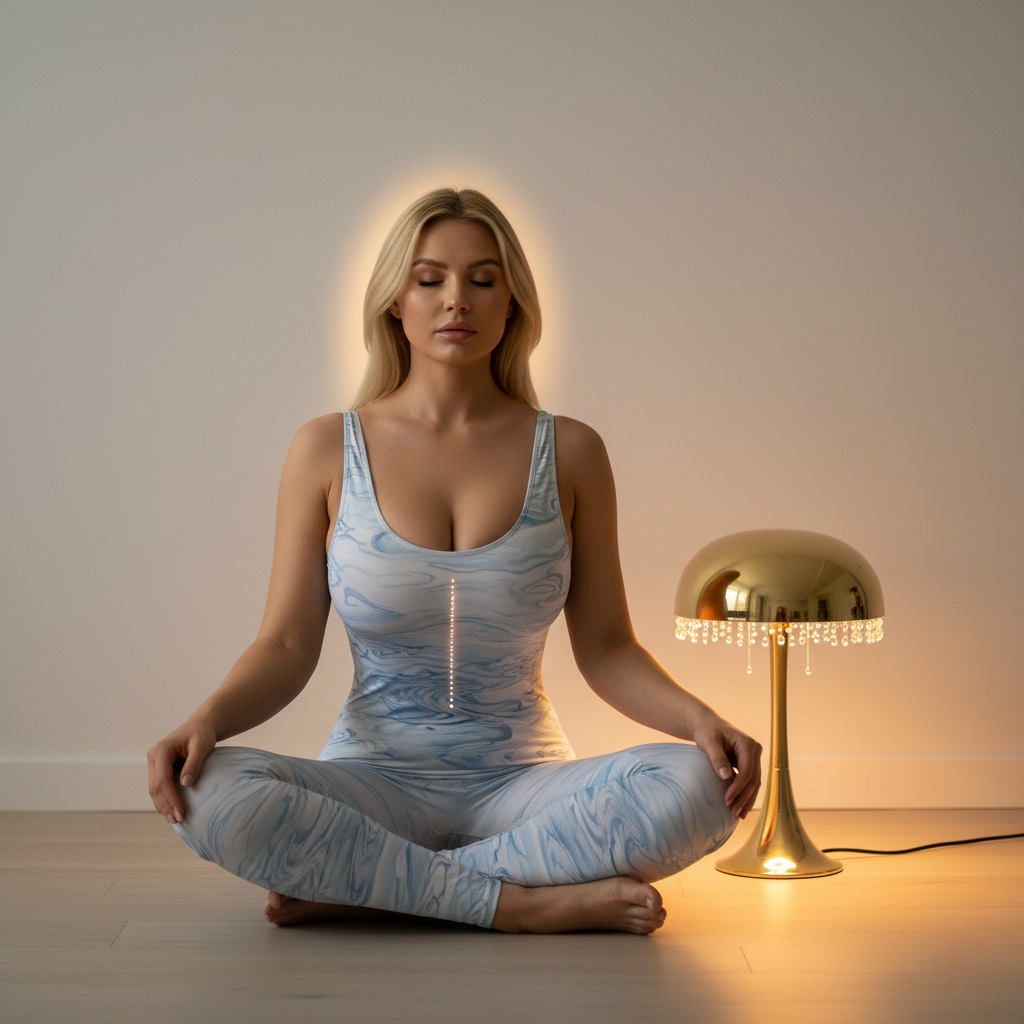
Is the anchor moment a short video of someone sitting down to meditate? Then the way the fabric drapes and the placement of a lamp to create a mood becomes a core design consideration.
You design the product for the frame. The pattern, trim, color accents, and even the recommended lamp placement for hero imagery are all engineered to make that anchor moment as powerful and repeatable as possible.
Micro-Practice Risk Calibration
In gymnastics, a high-difficulty move is only included in a routine if the athlete can execute it reliably under pressure. A spectacular element that fails 50% of the time is a liability. The same is true for product design. A high-concept, “wow-factor” element is a risk. It might be the first point of failure, the most expensive to manufacture, or the most awkward in daily use.
We mitigate this risk through micro-practice testing.
Instead of waiting for a full wear-test, we use short, intense, repeatable loops to spot failure points early. A micro-practice is a series of 5-10 repetitions of a 1-minute “ritual loop” that simulates the product’s core use case.
For a yoga top, the loop might be: Sun Salutation A > check phone > take a sip of water > repeat.
For a lifestyle object like a lamp, it might be: turn on > adjust position > read a page of a book > turn off > repeat.
During these loops with a fit model or tester, you look for specific failures: seam slippage, motif misplacement during movement, chafing, fabric bunching, instability in an object’s base. You iterate on the design—adjusting seam placement, reinforcing a stress point, changing a material—until the product passes the micro-practice test consistently. This calibrates risk, ensuring that the final design is not just beautiful, but robust.
AI design elite rhythmic
How to Operationalize the Playbook
This system can be integrated into your existing workflow starting today. Here is a step-by-step guide to putting Cn_rhythmic into practice.
Step 1: Create the Product Playbook
Before a single pattern piece is drafted, assemble the one-page playbook for the SKU. This is your single source of truth. It must contain:
Primary Motif & Its Stated Function: e.g., “Water-droplet motif used as a gradient to minimize stretch distortion.”
Anchor Poses/Frames: 3 reference photos or video stills that the design must excel in.
Pass/Fail Sampling Criteria: A simple checklist derived from your “Score-First” rubric.
This document prevents ambiguity and ensures that the design team, the pattern makers, the photographers, and the quality assurance team are all working towards the same objective goals.
Step 2: Prototype with the Stretch-Grid
To de-risk print design for stretch fabrics, create a digital prototyping tool: a stretch-grid overlay. In Adobe Illustrator or a similar program, produce your 1:1 scale repeat tile. On a separate layer, create a transparent grid (e.g., a 1cm x 1cm grid).
Based on body-mapping data, create a “distortion map” layer that warps this grid to simulate expected stretch zones—horizontally across the chest and glutes, vertically on the inner thigh. When you place your print motif under this distorted grid, you can immediately see how it will be warped on the body. This allows the artist to adjust motif placement away from critical seams and high-distortion areas before a single yard of fabric is printed, saving enormous amounts of time and money in sampling. This visual guide is also invaluable for communicating with manufacturing partners, particularly across Southeast Asia, where clear, graphical instructions can transcend language barriers.
Once you have a first physical sample, it’s time for rehearsal. Run a fit model through 20 short micro-practice cycles. This isn’t a casual wear-test; it’s a structured rehearsal. While they perform the loops, photograph the pre-defined anchor poses.
Review the footage. Does the key motif disappear into a seam during the pose? Does a strap slip off the shoulder after three repetitions? Does the legging waistband roll down? If the anchor moment fails visually or functionally in any of the cycles, the design is not yet repeatable. Revise the pattern, reinforce a seam, or adjust placement, then test again. You are optimizing for consistency, not just a single perfect shot.
Step 4: Finalize the Tech Pack & Factory Handoff
When the samples consistently pass the micro-practice and photographic tests, it’s time to freeze the tech pack. This document is the final, codified output of the entire Cn_rhythmic process. It should be exhaustive and unambiguous. Include:
Graded Points of Measure (POMs) for your full size range.
Fabric references and color lab values (e.g., Pantone TCX, Lab* values).
The final print files (AI vector, high-res PNG) with the stretch-grid and motif placement notes included as a reference for QA.
A production QA checklist that directly references the pass/fail criteria from the original Product Playbook.
Designing Lamp Fixtures that Anchor a Mood
The Cn_rhythmic philosophy extends beyond apparel. Consider small decorative lamps—what we’ve called “mushroom lamps” or “mood anchors” in our studio. These are not mere props in a photoshoot; they are functional objects that act as spatial anchors for photography, motion, and daily rituals.
By developing a simple, consistent lamp specification, brand designers and photographers can create a coherent visual atmosphere across an entire product release with minimal friction.
Core Lamp Spec Elements:
Light Temperature: Mandate a range of 2200K−2700K (warm dim). This color temperature is scientifically proven to be relaxing and produces exceptionally flattering skin tones.
Color Rendering Index (CRI): Require a CRI of >90. This ensures that the light source will not distort the colors of your products, preserving the fidelity of your prints and fabrics in photographs.
Shade Geometry: Define a simple, brand-aligned geometry. For example, a small dome with a water-droplet-shaped cap can visually echo the motifs used in a garment collection, creating subtle visual harmony.
Projection Masks: For creative video content, provide simple SVG templates that can be laser-cut and dropped into the lamp to create patterned projections (dappled light, soft stripes).
For each product release, designers should include a simple A4 lamp placement diagram. This one-sheet guide shows photographers and even customers how to position the lamp to achieve the intended “anchor moment” mood. This small piece of documentation dramatically reduces creative friction and improves the consistency of both professional and user-generated content.
AI design water drift bodysuit
Case Study: The “Water Drift” Capsule
To see the playbook in action, let’s imagine a capsule collection inspired by water motifs in classical Chinese landscape painting.
Inspiration: The gentle flow of water, the vertical lines of a waterfall, the soft halo of mist.
Initial Idea (Pre-Playbook): Print a traditional water pattern all over a set of leggings and a top.
Cn_rhythmic Execution:
Motif-as-Function: The vertical energy of a waterfall is translated into a central rising seam on the front of a bodysuit. This seam is a distinct panel that becomes a powerful vertical line, visually lengthening the torso. The zither-like motif is reinterpreted. During an inhale on camera, this line “rises,” creating an elegant visual cue. This is a Design Grammar Card in action.
Score-First Engineering: The mist motif is translated into a functional print fade. The print is darkest and sharpest at the hem of the leggings and top, fading to a lighter, softer pattern in the high-stretch zones of the hips and chest. This is designed against the Photographability metric, ensuring the print’s focal point remains intact and distortion is minimized.
Anchor Moment Staging: The primary anchor moment is defined as a seated meditative pose. A lamp placement diagram specifies that the “mood anchor” lamp should be placed at a 45° angle behind the model. This creates a soft halo of light that silhouettes the body, further emphasizing the central vertical motif of the bodysuit.
Result: In test shoots, the garment’s visual integrity in the anchor pose passed 95% of the time after just two micro-practice iterations. The design, guided by functional constraints, was not only more beautiful but also more robust. Pre-production fixes, identified during micro-practice, led to a projected lower return rate due to a better, more movement-tested fit.
The gap between a beautiful idea and a successful product is paved with intention. The world’s most captivating performers do not leave their success to chance, and neither should designers. By embracing the principles of deliberate constraint, functional motifs, and rigorous rehearsal, we can move beyond mere decoration.
We can begin to engineer perception. And in doing so, we create products that don’t just occupy space, but perform within it.
FAQ
Q: What is an AI design brief and why use one? A: An AI design brief structures cultural inspiration into explicit, machine-readable instructions (motif references, function goals, tolerances). It speeds iterative design and produces assets that are closer to production needs.
Q: How do I ensure AI outputs are factory-ready? A: Include strict constraints in the brief: 1:1 print tile sizes, stretch grid overlays, seam-safe zones, and export formats (AI + high-res PNG). Use micro-practice testing and sample iterations before finalizing a tech pack.
Q: Can I use AI to generate lamp projection templates and staging guides? A: Yes — include SVG mask prompts, projection resolution (e.g., 2048×2048), and desired light temperatures in the prompt. Generate multiple masks for creative testing and export as vector files for CNC or laser cutting.
Q: Can we translate a rhythmic routine into product design? A: Yes. Convert motifs into placement rules, define anchor poses, and test with micro-practices. Create a one-page Product Playbook per SKU.
Q: What is a micro-practice? A: A short (1–3 minute) activity repeated multiple times during sampling to reveal fit and print problems under movement.
Q: What should a Studio Pack include? A: Tech pack, 1:1 print tiles with stretch grid, graded POM, anchor photos, lamp placement map, and QA checklist.